
You’re probably familiar with adding premade backgrounds into your games. But what if you could dynamically create backgrounds and modify their colors, gradients, and effects on the fly?
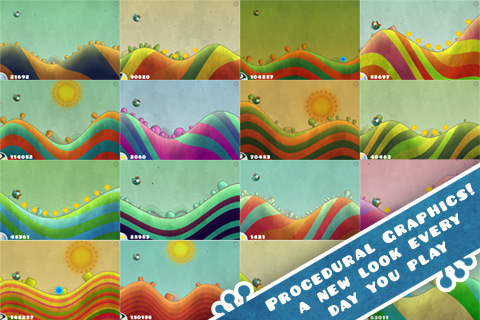
If you’ve seen the game Tiny Wings by Andreas Illiger on the App Store, you’ve seen an example of this in action.
In this tutorial series, you’ll get hands-on experience doing this yourself! You’ll learn:
- How to create textures on the fly
- How to create seamless textures with Gimp
- How to blend shadows and highlights onto textures for realistic effects
- How to create striped textures
- How to set up textures to repeat
- And much more!
Sergey did an excellent job on the demo project, so rather than reinvent the wheel, I’m going to convert his demo code into a tutorial series, along with some extra cool features!
This tutorial assumes you are familiar with Cocos2D. If you are new to either of these, check out some of the other Cocos2D tutorials on this site.
Creating Dynamic Textures with CCRenderTexture
One of the cool things about Tiny Wings is that the textures change every day, as you can see in the below screenshot:
But how can you create a dynamic texture in Cocos2D? Well, there is a cool class you can use called CCRenderTexture that allows you to draw to a texture, and then re-use that texture in your game.
Using CCRenderTexture is simple – you just take the following 5 steps:
- Create a new CCRenderTexture. You specify the width and height of the texture you want to create here.
- Call CCRenderTexture:begin. This sets up OpenGL so that any further drawing draws into the CCRenderTexture (rather than onto the screen).
- Draw into the texture. You can draw by using raw OpenGL commands, or by calling the visit methods of existing Cocos2D objects (which will issue the required OpenGL commands to draw those objects).
- Call CCRenderTexture:end. This will render the texture and turn off drawing into the texture.
- Create a new Sprite from the texture. You can now create a new sprite from the CCRenderTexture’s sprite.texture property.
Let’s try out RenderTexture to see how it works, to just create a simple colored texture.
But first you need a new project! So in Xcode, go to File\New\New Project, and the choose iOS\cocos2d v2.x\cocos2d iOS with Box2d template. Even though this tutorial doesn’t use Box2D, some of the follow-up tutorials will, so you’ll pick that now to be set up in advance.
Name the project TinySeal and choose iPhone for Device Family, click Next, choose a folder on your hard drive, and click Create.
Open the Supporting Files\Prefix.pch file and add the following import statement below the import to Foundation.h:
Code: Select all
#import "cocos2d.h"Code: Select all
#define IS_IPHONE ( [[[UIDevice currentDevice] model] isEqualToString:@"iPhone"] )
#define IS_HEIGHT_GTE_568 [[UIScreen mainScreen ] bounds].size.height >= 568.0f
#define IS_IPHONE_5 ( IS_IPHONE && IS_HEIGHT_GTE_568 )Then open up HelloWorldLayer.h and replace it with the following:
Code: Select all
@interface HelloWorldLayer : CCLayer
+(CCScene *) scene;
@endCode: Select all
#import "HelloWorldLayer.h"

@interface HelloWorldLayer() {
    CCSprite *_background;
}
@end

@implementation HelloWorldLayer

+(CCScene *) scene {
	CCScene *scene = [CCScene node];
	HelloWorldLayer *layer = [HelloWorldLayer node];
	[scene addChild: layer];
	return scene;
}

-(id) init {
	if((self=[super init])) {
	}
	return self;
}
@endBuild and run the project, and you should get a blank screen as shown below:
Next, add the following new method above the init method:
Code: Select all
-(CCSprite *)spriteWithColor:(ccColor4F)bgColor textureWidth:(float)textureWidth textureHeight:(float)textureHeight {

    // 1: Create new CCRenderTexture
    CCRenderTexture *rt = [CCRenderTexture renderTextureWithWidth:textureWidth height:textureHeight];

    // 2: Call CCRenderTexture:begin
    [rt beginWithClear:bgColor.r g:bgColor.g b:bgColor.b a:bgColor.a];

    // 3: Draw into the texture
    // You'll add this later

    // 4: Call CCRenderTexture:end
    [rt end];

    // 5: Create a new Sprite from the texture
    return [CCSprite spriteWithTexture:rt.sprite.texture];

}
Note that instead of calling the plain old CCRenderTexture:begin method, you call a convenience method named beginWithClear:g
 a: that clears the texture with a particular color before drawing.
You haven’t drawn anything yet – for now let’s just see what this plain colored texture looks like.
Wrap this up by adding the following new methods:
Code: Select all
- (ccColor4F)randomBrightColor {

    while (true) {
        float requiredBrightness = 192;
        ccColor4B randomColor =
            ccc4(arc4random() % 255,
                 arc4random() % 255,
                 arc4random() % 255,
                 255);
        if (randomColor.r > requiredBrightness ||
            randomColor.g > requiredBrightness ||
            randomColor.b > requiredBrightness) {
            return ccc4FFromccc4B(randomColor);
        }
    }

}

- (void)genBackground {

    [_background removeFromParentAndCleanup:YES];

    ccColor4F bgColor = [self randomBrightColor];
    _background = [self spriteWithColor:bgColor textureWidth:IS_IPHONE_5 ? 1024:512 textureHeight:512];

    CGSize winSize = [CCDirector sharedDirector].winSize;
    _background.position = ccp(winSize.width/2, winSize.height/2);
    [self addChild:_background z:-1];

}

- (void) onEnter {
    [super onEnter];
    [self genBackground];
    [self setTouchEnabled:YES];
}

- (void)ccTouchesBegan:(NSSet *)touches withEvent:(UIEvent *)event {
    [self genBackground];
}Then genBackground method calls the spriteWithColor:textureWidth:textureHeight: method you just wrote, and adds it to the center of the screen.
Note: Notice that you specify the width of the texture to be 1024 incase the device is an iPhone 5. This is because the iPhone 5 in landscape has a width of 1136 pixels and since Cocos2D uses points, this means 568 points. The closest power of two to 568 is 1024 hence the width is 1024. Why do you consider power of two? Read on to learn more.
As for onEnter, it calls genBackground and enables touches so that you can re-generate another random background just by tapping the screen.
Compile and run, and every time you run the app or tap the screen it will have a different colored background:

Creating Noise For the Texture
As you’ve probably noticed in Tiny Wings, the textures aren’t just flat colors – they’re decorated with a bit of noise to make them look like they have shadows and highlights.
You can always write some code to make dynamic noise, but it’s often easier (and more performant) to just ship your app with some premade noise – and that’s what you’re going to do in this tutorial.
One easy way to make random noise is through a free image editing program called Gimp. The rest of this section will show you how to make this texture for yourself, but if you’re like this guy:

Then you can just download the Noise2 I already made. Extract the contents of the file and add them to your project, you can then skip to the next section :]
If you want to follow along, download Gimp if you haven’t already, and start it up.
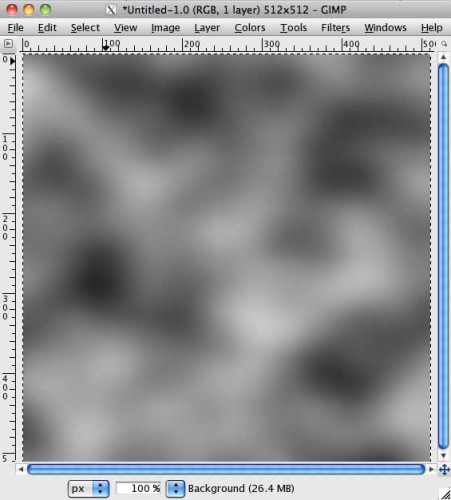
After Gimp starts up, go to File\New, and create a new Image of size 512×512. Then go to Filter\Render\Clouds\Solid Noise, tweak the parameters if you want, and click OK. You should then have something that looks like this:
You’re going to use this image to multiply the texture’s colors. So wherever the image is white, the original color will show through, and wherever it’s black, the original color will be darkened.
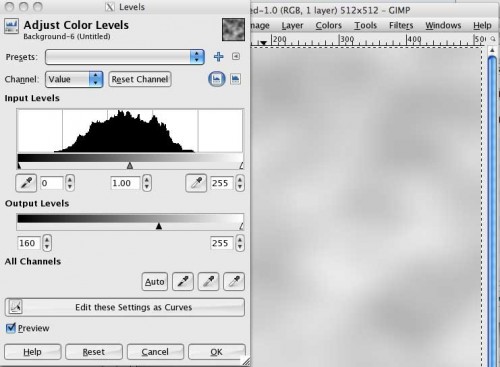
As it currently stands, there’s too much black in the image for the subtle effect we’re looking for. So to reduce the amount of black, go to Colors\Levels, and drag the leftmost slider in the “Output Levels” section to the right.
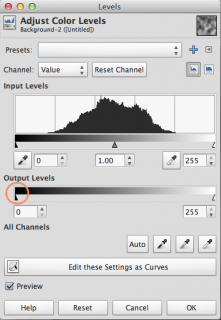
You will see the image begin to lighten up as shown below:
Click OK when you’re done. Then there’s one last step – the noise texture needs to be made seamless, so that if you repeat the texture everything lines up OK.
Gimp makes this extremely easy. Just go to Filters\Map\Make Seamless – and you’re done!
Use File\Export to and export your image as Noise.png somewhere on your hard drive.
Then repeat the above process to generate two more textures, one of size 1024×1024 for retina device and the other of size 2048×1024 for the iphone 5 4″screen. Make sure you name the first one Noise-hd.png and the other Noise-iphone5hd.png.
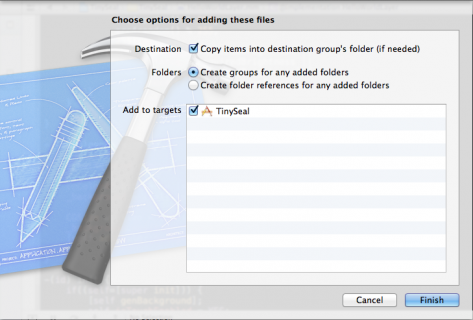
Then find the files in Finder and drag them into your TinySeals project. Verify that “Copy items into destination group’s folder” is selected, and click Finish.
Congrats, now you have the noise textures you can use to make your dynamic textures look more cool and realistic!
And now that you know how to create this basic texture, you can play around with it using Gimp’s filters to get different effects!
Applying Noise to Texture
Now that you have an image with some noise, you are going apply it to the texture you created with CCRenderTexture.
Inside spriteWithColor:textureWidth:textureHeight:, add the following code right after the comment for step 3:
Code: Select all
CCSprite *noise = [CCSprite spriteWithFile:@"Noise.png"];
[noise setBlendFunc:(ccBlendFunc){GL_DST_COLOR, GL_ZERO}];
noise.position = ccp(textureWidth/2, textureHeight/2);
[noise visit];There’s only one tricky bit – it’s this setBlendFunc method. What in the heck does that do?!
Well, the first constant passed in (GL_DST_COLOR) specifies how to multiply the incoming/source color (which is the noise texture), and the second constant passed in (GL_ZERO) specifies how to multiply the existing/destination color (which is the colored texture).
So effectively:
The existing color is multiplied by GL_ZERO, which means the existing color is cleared out.
The noise texture colors are multiplied by GL_DST_COLOR. GL_DST_COLOR means the existing colors, so the noise texture colors are multiplied by the existing color. So the more “white” in the noise, the more of the existing color appears, but the more “black” in the noise the darker the existing color is.
The above two colors are added together, and since the first is zero all that really matters in this case is the second result.
By the way, I found (and still sort-of find) these blend constants confusing, but luckily there’s a great online tool that you can use to visualize the effects of these blend constants.
Anyway, that’s all you need! Compile and run your code, you will now see a subtle shadow effect on your texture.
Note that it often doesn’t look good on the simulator, you might need to try it on an actual device.

Adding a Gradient to the Texture
To make the texture look even better, let’s add a gradient from top to bottom, where the texture will get darker and darker going down.
You could do this by modifying the noise image with Gimp, but you can also do it in code, which makes things more dynamic and easily modifiable.
The basic idea is that you will draw a black rectangle on top of the texture, but it will be completely transparent up top, and opaque at the bottom. This will keep the top untouched, but gradually darken the image going down.
To do this, you need to use some OpenGL commands. If you are new to OpenGL, don’t worry – I will show you the code you need and explain how it works at a high level, which will get you through this tutorial. At the end of the tutorial, I’ll give you a reference for more information.
Inside spriteWithColor:textureWidth:textureHeight:, add the following code right before creating the noise sprite:
Code: Select all
self.shaderProgram = [[CCShaderCache sharedShaderCache] programForKey:kCCShader_PositionColor];

CC_NODE_DRAW_SETUP();

// 3: Draw into the texture
float gradientAlpha = 0.7f;
CGPoint vertices[4];
ccColor4F colors[4];
int nVertices = 0;

vertices[nVertices] = CGPointMake(0, 0);
colors[nVertices++] = (ccColor4F){0, 0, 0, 0 };
vertices[nVertices] = CGPointMake(textureWidth, 0);
colors[nVertices++] = (ccColor4F){0, 0, 0, 0};
vertices[nVertices] = CGPointMake(0, textureHeight);
colors[nVertices++] = (ccColor4F){0, 0, 0, gradientAlpha};
vertices[nVertices] = CGPointMake(textureWidth, textureHeight);
colors[nVertices++] = (ccColor4F){0, 0, 0, gradientAlpha};

ccGLEnableVertexAttribs(kCCVertexAttribFlag_Position  | kCCVertexAttribFlag_Color);

glVertexAttribPointer(kCCVertexAttrib_Position, 2, GL_FLOAT, GL_FALSE, 0, vertices);
glVertexAttribPointer(kCCVertexAttrib_Color, 4, GL_FLOAT, GL_FALSE, 0, colors);
glBlendFunc(CC_BLEND_SRC, CC_BLEND_DST);
glDrawArrays(GL_TRIANGLE_STRIP, 0, (GLsizei)nVertices);So the above code first defines the four vertices for the texture in the order
top left, top right, bottom left, bottom right – and the colors at each point.
You might wonder why the vertices were drawn in this order. That is because you’re going to draw two triangles to make up this rectangle:
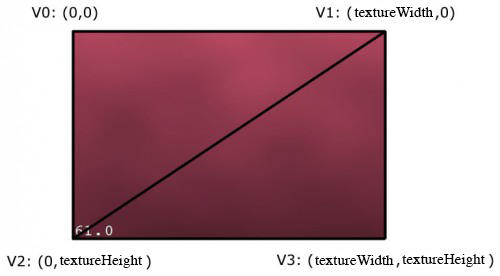
You’re going to draw these triangle using GL_TRIANGLE_STRIP, which means the first triangle is the first three vertices in the array, and the rest of the triangles take the previous two vertices and the next vertex.
So the first triangle is V0, V1, V2, and the second triangle is V1, V2, V3.
After defining the array of vertices and colors, you pass them to the OpenGL ES pipeline with glVertexAttribPointer specifying kCCVertexAttrib_Position as the constant. Next you need to pass the colors array, this is done using the same method but this time you pass kCCVertexAttrib_Color as the constant.
Compile and run your code, and you should see a neat gradient texture!

Note: If you’d like to learn more about OpenGL in order to better understand what these commands are doing, check out our OpenGL tutorial series.
Creating a Texture with Stripes
Before you start writing code to draw stripes, let’s take a minute to think about our strategy.
You will start by coloring the texture one color (say blue), and then you’ll draw several stripes diagonally across it (say green), as you can see in the diagram below:
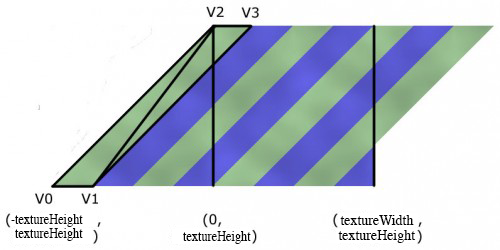
Notice that since the stripes are diagonal, you’re actually going to have to start the drawing outside of the bounds of the texture, and continue drawing some of the stripes outside of the bounds of the texture.
Also note that to get a nice 45 degree angle, you’ll offset V1 from V0 by the height of the texture (that way both the DX and the DY are textureHeight, hence a 45 degree angle).
OK, let’s see the code for this. Add a new method above the init method as follows:
Code: Select all
-(CCSprite *)stripedSpriteWithColor1:(ccColor4F)c1 color2:(ccColor4F)c2 textureWidth:(float)textureWidth
   textureHeight:(float)textureHeight stripes:(int)nStripes {

    // 1: Create new CCRenderTexture
    CCRenderTexture *rt = [CCRenderTexture renderTextureWithWidth:textureWidth height:textureHeight];

    // 2: Call CCRenderTexture:begin
    [rt beginWithClear:c1.r g:c1.g b:c1.b a:c1.a];

    // 3: Draw into the texture

    // Layer 1: Stripes
    CGPoint vertices[nStripes*6];
    ccColor4F colors[nStripes*6];

    int nVertices = 0;
    float x1 = -textureHeight;
    float x2;
    float y1 = textureHeight;
    float y2 = 0;
    float dx = textureWidth / nStripes * 2;
    float stripeWidth = dx/2;
    for (int i=0; i<nStripes; i++) {
        x2 = x1 + textureHeight;

        vertices[nVertices] = CGPointMake(x1, y1);
        colors[nVertices++] = (ccColor4F){c2.r, c2.g, c2.b, c2.a};

        vertices[nVertices] = CGPointMake(x1+stripeWidth, y1);
        colors[nVertices++] = (ccColor4F){c2.r, c2.g, c2.b, c2.a};

        vertices[nVertices] = CGPointMake(x2, y2);
        colors[nVertices++] = (ccColor4F){c2.r, c2.g, c2.b, c2.a};

        vertices[nVertices] = vertices[nVertices-2];
        colors[nVertices++] = (ccColor4F){c2.r, c2.g, c2.b, c2.a};

        vertices[nVertices] = vertices[nVertices-2];
        colors[nVertices++] = (ccColor4F){c2.r, c2.g, c2.b, c2.a};

        vertices[nVertices] = CGPointMake(x2+stripeWidth, y2);
        colors[nVertices++] = (ccColor4F){c2.r, c2.g, c2.b, c2.a};
        x1 += dx;
    }

    self.shaderProgram =
    [[CCShaderCache sharedShaderCache] programForKey:kCCShader_PositionColor];

    // Layer 2: Noise
    CCSprite *noise = [CCSprite spriteWithFile:@"Noise.png"];
    [noise setBlendFunc:(ccBlendFunc){GL_DST_COLOR, GL_ZERO}];
    noise.position = ccp(textureWidth/2, textureHeight/2);
    [noise visit];

    // Layer 3: Stripes
    CC_NODE_DRAW_SETUP();
    glVertexAttribPointer(kCCVertexAttrib_Position, 2, GL_FLOAT, GL_FALSE, 0, vertices);
    glVertexAttribPointer(kCCVertexAttrib_Color, 4, GL_FLOAT, GL_TRUE, 0, colors);
    glDrawArrays(GL_TRIANGLES, 0, (GLsizei)nVertices);

    // 4: Call CCRenderTexture:end
    [rt end];

    // 5: Create a new Sprite from the texture
    return [CCSprite spriteWithTexture:rt.sprite.texture];
}It first creates an array of vertices and colors - for each stripe, you need 6 vertices - 3 vertices times 2 triangles. You can't use triangle strip here, because the stripes aren't adjacent. The colors array stores the color at each vertex of the triangle.
The first vertex is at (-textureHeight, textureHeight) as you can see in the diagram above, and the next vertex is (-textureHeight+stripWidth, textureHeight). The third is at (0, 0) and the fourth is at (stripeWidth,0). These are the vertices you need for one stripe, and each time you advance by double the length of a stripe and continue until all stripes are done.
Now you can try this out by modifying your genBackground method as follows:
Code: Select all
- (void)genBackground {

    [_background removeFromParentAndCleanup:YES];

    ccColor4F bgColor = [self randomBrightColor];
    ccColor4F color2 = [self randomBrightColor];
    //_background = [self spriteWithColor:bgColor textureSize:512];
    int nStripes = ((arc4random() % 4) + 1) * 2;
    _background = [self stripedSpriteWithColor1:bgColor color2:color2
                        textureWidth:IS_IPHONE_5?1024:512 textureHeight:512 stripes:nStripes];

    self.scale = 0.5;

    CGSize winSize = [CCDirector sharedDirector].winSize;
    _background.position = ccp(winSize.width/2, winSize.height/2);
    [self addChild:_background];
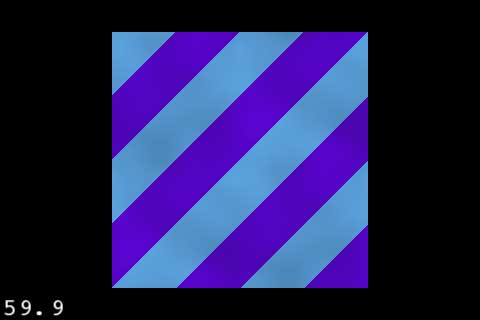
}Compile and run, and as you tap you should see randomly generated stripe textures!
Repeating Backgrounds
For both the striped background and the gradient background, you want to be able to tile them across an area of space that may be wider than the texture.
A simple way of doing this would be to make multiple CCSprites and chain them together. But that would be crazy, because there's a simpler way - you can set up the textures so they repeat!
Try this out for yourself by making the following changes to HelloWorldLayer.mm:
Code: Select all
// Add to genBackground, right BEFORE the call to addChild
ccTexParams tp = {GL_LINEAR, GL_LINEAR, GL_REPEAT, GL_REPEAT};
[_background.texture setTexParameters:&tp];

// Add to bottom of onEnter
[self scheduleUpdate];

// Add after onEnter
- (void)update:(ccTime)dt {

    float PIXELS_PER_SECOND = 100;
    static float offset = 0;
    offset += PIXELS_PER_SECOND * dt;

    CGSize textureSize = _background.textureRect.size;
    [_background setTextureRect:CGRectMake(offset, 0, textureSize.width, textureSize.height)];

}GL_LINEAR is a fancy way of saying "when displaying the texture at a smaller or larger scale than the original size, take a weighted average of the nearby pixels."
GL_REPEAT is a fancy way of saying "if you try to index a texture at a coordinate outside the texture bounds, put what would be there if the texture were to continuously tile."
Also, it schedules an update that updates the visible part of the texture to be continuously moving forward along the x-axis. This allows you to see the texture repeating over time.
Compile and run and now you'll see a continuously scrolling and repeating texture! You can try this with the background gradient texture and that will work also.
Gratuitous Highlights
If you look at the Tiny Wings implementation of the hill texture, you'll see it has a slight highlight as top and a gradient along the bottom to make it look nicer. So let's modify our stripe texture for this.
Add the following right after the glDrawArrays call in stripedSpriteWithColor1:color2:textureWidth:textureHeight:stripes: method:
Code: Select all
float gradientAlpha = 0.7;

nVertices = 0;

vertices[nVertices] = CGPointMake(0, 0);
colors[nVertices++] = (ccColor4F){0, 0, 0, 0};

vertices[nVertices] = CGPointMake(textureWidth, 0);
colors[nVertices++] = (ccColor4F){0, 0, 0, 0};

vertices[nVertices] = CGPointMake(0, textureHeight);
colors[nVertices++] = (ccColor4F){0, 0, 0, gradientAlpha};

vertices[nVertices] = CGPointMake(textureWidth, textureHeight);
colors[nVertices++] = (ccColor4F){0, 0, 0, gradientAlpha};

glVertexAttribPointer(kCCVertexAttrib_Position, 2, GL_FLOAT, GL_FALSE, 0, vertices);
glVertexAttribPointer(kCCVertexAttrib_Color, 4, GL_FLOAT, GL_TRUE, 0, colors);
glBlendFunc(CC_BLEND_SRC, CC_BLEND_DST);
glDrawArrays(GL_TRIANGLE_STRIP, 0, (GLsizei)nVertices);

// layer 3: top highlight
float borderHeight = textureHeight/16;
float borderAlpha = 0.3f;
nVertices = 0;

vertices[nVertices] = CGPointMake(0, 0);
colors[nVertices++] = (ccColor4F){1, 1, 1, borderAlpha};

vertices[nVertices] = CGPointMake(textureWidth, 0);
colors[nVertices++] = (ccColor4F){1, 1, 1, borderAlpha};

vertices[nVertices] = CGPointMake(0, borderHeight);
colors[nVertices++] = (ccColor4F){0, 0, 0, 0};

vertices[nVertices] = CGPointMake(textureWidth, borderHeight);
colors[nVertices++] = (ccColor4F){0, 0, 0, 0};

glVertexAttribPointer(kCCVertexAttrib_Position, 2, GL_FLOAT, GL_FALSE, 0, vertices);
glVertexAttribPointer(kCCVertexAttrib_Color, 4, GL_FLOAT, GL_TRUE, 0, colors);
glBlendFunc(CC_BLEND_SRC, CC_BLEND_DST);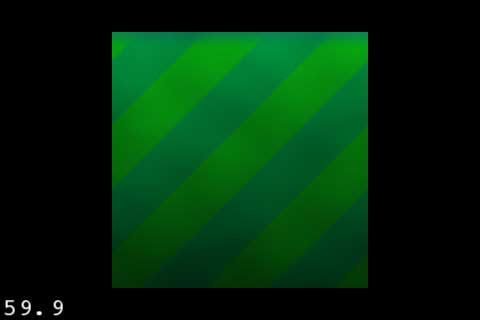
glDrawArrays(GL_TRIANGLE_STRIP, 0, (GLsizei)nVertices);Compile and run, and now you should see your stripes looking even better, with a gradient and a highlight!
Where To Go From Here?
Here is the sample project with all of the code you've developed in the above tutorial.
If you want, why not try to modify the noise texture to something of your own creation to see what sort of effects you can make? Or tweak this code in other ways to see if you can make it look even better. If you do, please share your results in the forum discussion!
From here, check out the next part of the tutorial series, where you'll learn how you can use these dynamic textures to make a game like Tiny Wings! :]
Original Article
